

Farewell... for now
Tutorial Tuesday: Reindeer Rice Krispies
I know I have promised a lot of tutorials for December, but as you all know it is the busiest time of year! I made these reindeer rice krispy treats. The great thing about rice krispies is that you can mold them to be anything you want! I wasn't able to do a video tutorial so I hope these pictures will take you step-by-step easily:
I made cocoa krispies the night before so that they were able to harden before I could start working with it.
First form the base of the head
.JPG)
To make the antlers break a pretzel in half... it takes a lot of practice!!
.JPG)
Stick them in the top of the head carefully they break really easily!
.JPG)
Make a smaller ball for the nose
.JPG)
I melted a marshmallow with a little bit of water so that I could use it as paste. Frosting does not stick to these rice krispies very well!
.JPG)
Add some marshmallow to a red M&M and stick on the nose and the eyes
.JPG)
I let them sit out on tin foil because I found they stick on the plastic wrap. I found these already made eye balls at Target in the baking isle.
.JPG)
And here is your final product! I think they are so cute and great for a fun Christmas celebration!
.JPG)
Happy Thanksgiving!
Wishing you a Happy Thanksgiving from my family to yours!
+-+Copy.JPG)

+-+Copy.JPG) |
| This is from the ICE show at the Gaylord Texan! It was so fun to see all of the Madagascar themed ice sculptures! |
Little Delights Project
It has been way too long since I have had a Little Delights Project post!

1. I'm loving that it is finally cooling off down here in the south. It's sweater season!!!
2. We are starting to decorate for Christmas early this year. I love that my mom decorates the whole house so festive.
3. I teach little 8 year olds in church and one of them gave me a little present wrapped with lined paper and tape. Another one of the kids drew me a picture! They are so thoughtful!
4. I've also already started listening to Christmas music :)
5. Thanksgiving is exactly ONE week away!! I'm ready for some turkey, mashed potatoes, orange rolls, pumpkin pie, cranberry sauce, and so much more!
Don't know what the Little Delights Project is? Read here.
Tutorial Tuesday: Thanksgiving Cake Balls
I can't believe that Thanksgiving is coming up so fast! I'm ready to eat some delicious food :) This is a tutorial that I did for a book review in September, but these would be perfect for Thanksgiving dessert. They are called Toffee-Brown Butter-Pecan cake balls!

Just to warn you that they are very rich so if you make them small they will be a perfect end to a big Thanksgiving feast!
I will be making some more tutorials soon so be on the lookout for some holiday treats! :)

Just to warn you that they are very rich so if you make them small they will be a perfect end to a big Thanksgiving feast!
I will be making some more tutorials soon so be on the lookout for some holiday treats! :)
A Party To Remember
What's better than having a birthday party where your friends make your dream cake?! I had such a fun time helping with my little sisters birthday party for her 12th birthday. Her theme was pink and zebra which was so much fun to decorate with!
+-+Copy.JPG)
I started out showing the girls the basics of cake decorating. They had a lot of fun experimenting and figuring out how to work a piping bag.


They both were very close to the picture! They all had a great time and I was exhausted by the end :)
Happy Birthday Cami!! I love you!
+-+Copy.JPG)
I started out showing the girls the basics of cake decorating. They had a lot of fun experimenting and figuring out how to work a piping bag.

My sister had me draw out what her dream cake would look like and this is what she decided on!

Then her friends had to answer questions about my sister and if they got the question right they got a detailed clue about her dream cake. If they got the question wrong they got a very vague hint about her cake. Once they gathered their clues from the game, they went to their work stations and started making what they thought the dream cake was supposed to look like!
Here is their great team work!


They did such a great job for being first time cake decorators!! Here is the finished product:

Happy Birthday Cami!! I love you!
Tutorial Tuesday: Election Day Celebration

Happy Election Day!! These cupcakes would be a great edition to an election day celebration!
I voted! Have you?
Tutorial Tuesday: Candy Corn Cake!
One of my favorite parts of Halloween is getting to eat delicious candy corn so I decided that was my inspiration for this cake! I added some scroll work to each layer to dress it up a little :)

I used my paper towel technic to smooth the layer of frosting. I used a #7 Wilton piping tip, and the frosting was very thin!!!
I didn't record a video for this one because I was doing the same scroll work that I did in this video:

I like candy corn... if you couldn't tell already :)
HAPPY HALLOWEEN!
Tutorial Tuesday: Chic Halloween Cupcakes
I love Halloween and since it is now October I am so excited to share my Halloween tutorials with you all! I was going for an elegant look to these cupcakes instead of the cute or scary look. I decided to focus on black and silver with LOTS of glitter :) The cupcake toppers are made out of chocolate so it is easy to eat and tastes great! Don't you think these would look great at a chic Halloween party?


Tutorial Tuesday: Learn How To Make Your Dream Cake
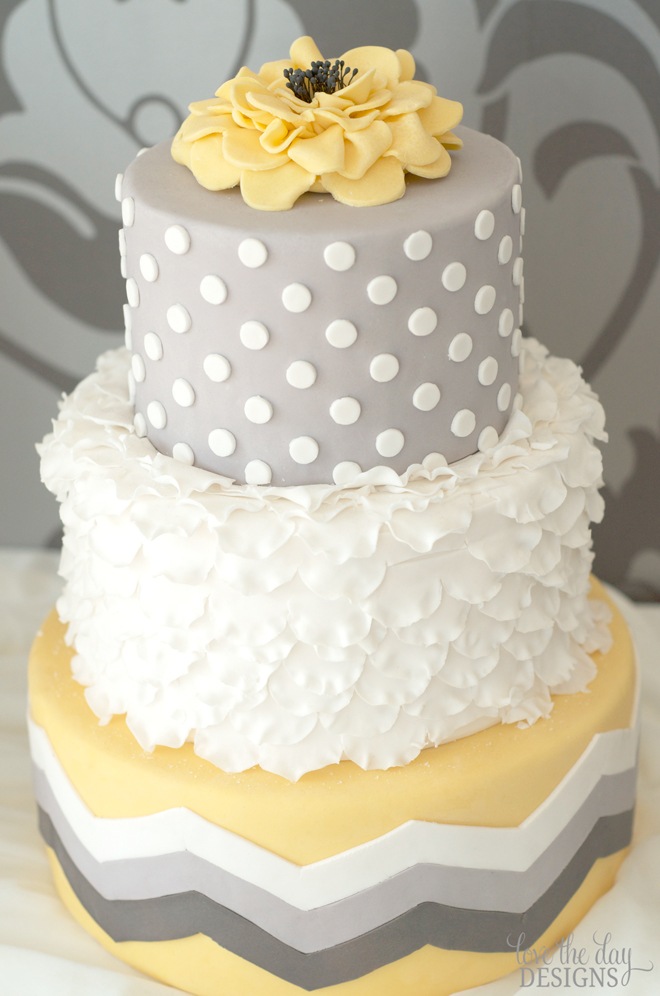
Remember the last weeks in July/first of August when everyone submitted their photos of their dream cake and then voted on their favorite? Well it is finally here!! The yellow, grey, and white chevron cake is finished and ready for you all to learn how to make!

.JPG)
If you make this cake, send a picture and I'll add it to this post!
Here is what the original cake looked like:

Add this image to Pinterest and save it for later!

And thanks to my sister I had matching nails while I decorated! :)
.JPG)
If you make this cake, send a picture and I'll add it to this post!
Here is what the original cake looked like:
 |
| via |

Add this image to Pinterest and save it for later!
Little Delights Project
Here are my Little Delights this week:
1. The 'So You Think You Can Dance' finale was on Tuesday and I was loving every second of it. Those dancers are a.maz.ing.
2. My sister (11 years old by the way) did some pretty amazing nail work! It's like having my own personal nail stylist :) Plus it's great sister quality time!

3. I have decided that I want to join Teach For America one day! It is such an amazing program. They choose 2,000 teachers that get to go to underprivileged schools to teach and inspire the students to do their best. I want to change students lives!
4. The smell of pumpkin chocolate chip cookies baking when you walk in the house is THE best smell to bring in fall :) I can't wait for the pumpkins, leaves changing color, and the delicious food!
What are your Little Delights this week?
Remembering 9/11
11 years ago, lives were lost and many were affected by the devastating tragedy.
Let us never forget.
A BIG thank you to the many men and women that have/are serving our country so faithfully.
Tutorial Tuesday: Toffee-Brown Buttered-Pecan Cake Balls
I am so excited for this tutorial today! I am making a recipe from a new book that is coming out called Cake Balls by Dede Wilson. The recipe is called Toffee-Brown Butter-Pecan. It has a great butter flavor that is incorporated throughout the whole recipe and also compliments the pecans. This is a very rich flavor! I also show you how to dip the cake balls into the white chocolate and then to decorate them beautifully :)
(If you just want a tutorial on how to make cake balls instead of watching the recipe start the video at 5:44)
One of the things that I love about this book is that all of the recipes are so unique! They include everything from apple pie and chocolate cookie dough to creme brulee and vegan chocolate! It really has something for everyone. I can't wait to try some more of these recipes!
Here are the exact measurements:
Pecan Toffee:
-4 tablespoons unsalted butter
-1/2 cup sugar
-Pinch of salt
-3/4 cup toasted pecan halves
Frosting:
-6 tablespoons unsalted butter (room temperature)
-3 cups confectioners' sugar
-2 tablespoons whole milk
-1 teaspoon pure vanilla extract
Let me know if you try this recipe and what you think! Good luck!!

Recipe ©2012 by Dede Wilson and used by permission
of The Harvard Common Press.
In Progress...
Sorry I have been pretty absent this week! I am in the process of making the Dream Cake that I will be doing a tutorial with. You definitely don't want to miss it :)
Also next week for Tutorial Tuesday I have a fantastic tutorial that is from a new book coming out called Cake Balls by Dede Wilson who is a fantastic baker. I am going to be featuring a recipe on her blog tour... and here's just a hint about the deliciousness that you will be seeing... Toffee-Brown Butter-Pecan cake balls. Oh goodness it is to die for! #thisbookisgoingtobeabestseller

Happy Wednesday!
Little Delights Project
2. This unusual cooler weather in August is making me so excited for fall! I love the food, holidays, and family time.
3. I made Oreo truffles and I decided they need to be a staple in the house. Have you ever made them? They only require 3 ingredients and an hour total to make!
4. Having my grandparents fly in last weekend was so fun! We had a great time :)
5. Relearning Spanish has been going great! I am remembering what I learned in high school and it's building a great foundation.
What are you little delights this week? Link up here:
(closed)
Little Delights Project and the Dream Cake Winner!
Thank you so much for everyone that has participated in the "Learn How To Make Your Dream Cake" contest! We have a winner!!!
|
| via |
I can't wait to make a tutorial for you all to watch! Hopefully I'll have the tutorial ready by the last week in August :)
I hope you have all had a great week! Here are my 5 Little Delights from this week:
1. Spending time in St. George with my family! We went shopping, went to the lake, and watched the Olympics all day. It was the perfect ending to our 3 week vacation :)
2. So many kind comments/emails from my readers! Thanks!
3. Last night I fell asleep to the wonderful Texas thunderstorms. So awesome!
4. Shopping with my sister... we always have a great time :)
5. I'm going to start to relearn Spanish. I'm a little bit rusty from high school but I'm excited to get back into it!
Top Three Dream Cake Entries
I'm finally back from vacation! Everyone's cake entries are so awesome it was so hard to choose my top three. I wish I could just do all of them! Now I need your help in voting for the one that you would like the most to learn. I will be making a video tutorial on the step-by-step process of decorating that cake. I decided that I would go with wedding cakes this time, but don't worry there will definitely be another chance to submit your dream cake again!
Here are the top three:
#1: Yellow and grey
These colors are very popular right now for weddings and so is the chevron pattern on the bottom layer. I also love the frilly middle layer.
#2: Pink rose ombre
These large roses are a big trend right now and the pink shades are perfect.
#3 Elegant and classic wedding cake
This is definitely one of the harder ones but I can make it into easy step that you can follow. I love the frilly edges and the accent of flowers. This cake is very unique!
Please comment below and tell me which one you would like to see a tutorial on! I will count up the votes on August 15th.
p.s. this takes place of the weekly Little Delights Project post so please vote for your favorite!
Here are the top three:
#1: Yellow and grey
These colors are very popular right now for weddings and so is the chevron pattern on the bottom layer. I also love the frilly middle layer.
|
| via |
#2: Pink rose ombre
These large roses are a big trend right now and the pink shades are perfect.
 |
| via |
#3 Elegant and classic wedding cake
This is definitely one of the harder ones but I can make it into easy step that you can follow. I love the frilly edges and the accent of flowers. This cake is very unique!
 |
| via |
Please comment below and tell me which one you would like to see a tutorial on! I will count up the votes on August 15th.
p.s. this takes place of the weekly Little Delights Project post so please vote for your favorite!
Learn How To Make Your Dream Cake!
Have you seen a picture of a cake that you have wanted to make but didn't know how? I am going to be choosing one of your cake pictures and I will be making a tutorial on how to make it from start to finish!
Round One:
Submit any cake picture on this post. It can be wedding, birthday, cake pops, cupcakes, etc. You can link a picture from Pinterest, Twitter, or even a website (use the URL to link up). I will then choose 3 from all of your pictures on August 6th.
Round two:
Everyone will vote on which of the three cakes they would like to see me decorate.
Make sure you tell your friends and family to link up too!
Round One:
Submit any cake picture on this post. It can be wedding, birthday, cake pops, cupcakes, etc. You can link a picture from Pinterest, Twitter, or even a website (use the URL to link up). I will then choose 3 from all of your pictures on August 6th.
Round two:
Everyone will vote on which of the three cakes they would like to see me decorate.
Make sure you link your pictures before August 5th!
Make sure you tell your friends and family to link up too!
5 Little Delights This Week
1. I ate at Zupas this week! Have you ever heard of this place? It has amazing salads, soups, and sandwiches.
2. Spending so much time this week with my family has been amazing.
3. I am leaving for Hawaii today! (Which also means that I get to spend even MORE time with my family!)
4. I am going to be reading Divergent (by Veronika Ross) while I travel and I've heard it is great! I love the summer time when I can read as much as I want.
5. My first roommate from freshman year just got married yesterday! She looked SO beautiful and I am so happy for her! (p.s. her cake was beautiful!)

Link up YOUR Little Delights this week:
Classic White Frosting Recipe

1 cup shortening
1 1/2 teaspoons vanilla
1/2 teaspoon almond extract
4 cups powdered sugar
3-4 tablespoons milk
Beat the shortening, vanilla, and almond extract on medium speed for 30 seconds. Then gradually add in 2 cups of powdered sugar. Add 2 tablespoons of milk. Gradually add in the last 2 cups of powdered sugar. Then add some more milk until you get your desired consistency.
(makes about 3 cups)
Try this when you frost your cake with a paper towel and you will have success with it! Let me know how it turns out for you! Good luck!
Don't forget to pin this to Pinterest to save the recipe!

Don't forget to pin this to Pinterest to save the recipe!

My Favorite Cake Recipes
I have had a lot of questions about the cake recipes that I use. Here are some basic recipes that you will love!

I like to make cakes that are fast and easy... so I use a mix from a cake box. Let's just put it this way, when you spend so much time on decorating a cake I just don't have the energy to make a cake from scratch and still have time left over to breathe. They taste just as great especially if you modify the recipe on the box. They are very moist and people never know the difference!
 1 box of chocolate cake mix
3 eggs
1 cup of milk*
1 tsp. vanilla extract (optional)
 1 box of yellow cake mix
1 package (4 oz.) vanilla pudding mix (powder)
3 eggs
1 cup milk
1 tsp. vanilla extract
 1 box white cake mix
3 eggs
1 cup milk*
1 tsp. vanilla/almond/lemon extract (you can choose which flavor you like best)
Combine the cake mix with all of the ingredients. Bake at 350 for 14-16 minutes (for cupcakes) or if you are making a cake follow the time instructions on the box but make sure you keep checking on the cake! I have found that ovens vary and I always have to be careful. To check to see if the cake is ready, touch it with your finger lightly and if it springs back then you're good to go!
*You can also substitute 1 cup of sour cream instead of milk! I know it sounds gross but if you are ever daring enough to try it, it makes the cake so moist!

I like to make cakes that are fast and easy... so I use a mix from a cake box. Let's just put it this way, when you spend so much time on decorating a cake I just don't have the energy to make a cake from scratch and still have time left over to breathe. They taste just as great especially if you modify the recipe on the box. They are very moist and people never know the difference!
3 eggs
1 cup of milk*
1 tsp. vanilla extract (optional)
1 package (4 oz.) vanilla pudding mix (powder)
3 eggs
1 cup milk
1 tsp. vanilla extract
3 eggs
1 cup milk*
1 tsp. vanilla/almond/lemon extract (you can choose which flavor you like best)
Combine the cake mix with all of the ingredients. Bake at 350 for 14-16 minutes (for cupcakes) or if you are making a cake follow the time instructions on the box but make sure you keep checking on the cake! I have found that ovens vary and I always have to be careful. To check to see if the cake is ready, touch it with your finger lightly and if it springs back then you're good to go!
*You can also substitute 1 cup of sour cream instead of milk! I know it sounds gross but if you are ever daring enough to try it, it makes the cake so moist!


